How To Fix Crumbling Shoes - Sole Care Guide
You might be thinking there's no way to save your old model Jordans and other pairs with crumbling soles. Before you head to a shoe repair shop, know this: it's possible!
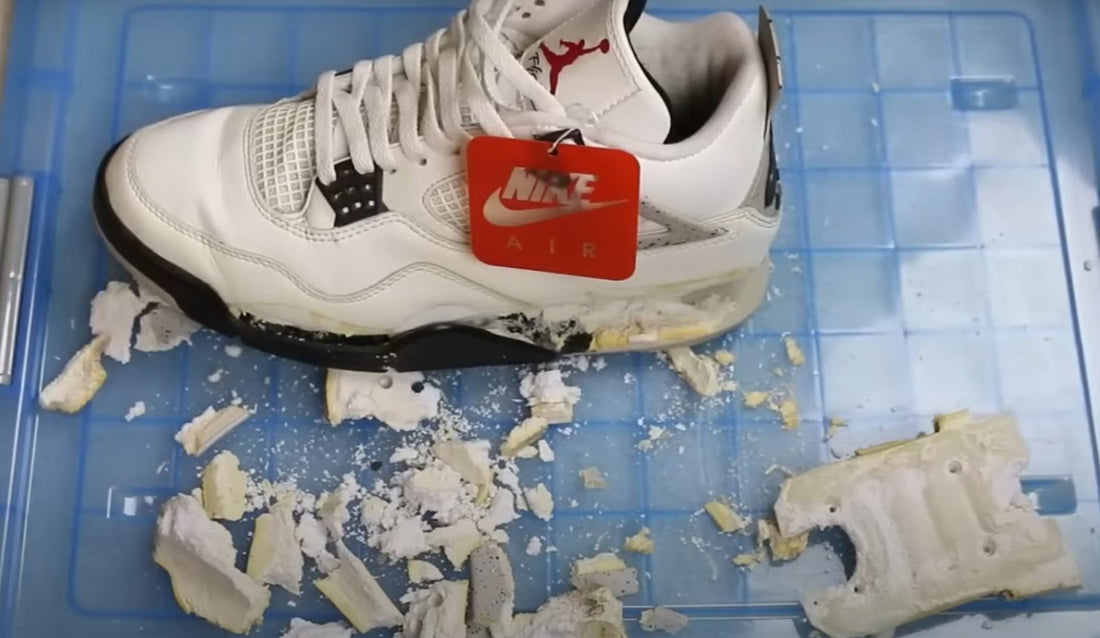
Many sneakers, especially those with midsoles made from polyurethane, or PU soles, suffer this fate. This material, while resistant to wear, isn't immune to time. It may seem like new pairs, but it doesn't happen. But your beloved shoes can be brought back to life.
Stick with us, and I'll show you how to fix your shoes with crumbling soles. It's simpler than you think!
Why Shoe Soles Crumble?
Sole crumbling, or Hydrolysis, is a damage that occurs in many safety shoe soles made from polyurethane (PU) materials. This condition arises when water molecules instigate a chemical reaction, breaking the molecular bonds within the PU.
Factors such as exposure to moisture, heat, and UV light can dramatically accelerate this process.
Paired with the wear and tear from regular use, this can cause the once sturdy soles to become loose, lose their integrity from heel to toe, and eventually crack and crumble.
Often, you'll notice this issue first appearing in the midsole of leather shoes or on the bottoms of rubber shoes, typically starting as small fissures that worsen over time.
Step-by-Step Guide on How to Fix Your Crumbing Shoes
Step 1: Clean the Shoe To Be Glued
Begin by cleaning the affected area around the edge of the sole. Use a brush to remove any dirt and debris.
If the sole is visibly dirty, you may also want to use a cloth dabbed in alcohol or a mild cleanser to ensure that the surface is as clean as possible. Don't worry about having the shoe look perfect—focus on where the glue will adhere.
Step 2: Repair the Sole of the Shoe With Glue
Once the shoe is clean, it's time to apply the right kind of adhesive. Not just any shoe glue will work; you'll need a strong and flexible adhesive designed for footwear—like super glue designed for shoes.
If there's a hole, gently fill it with enough glue to create a surface that can adhere to your replacement sole. Use sandpaper to gently rough up the area if it's too smooth for the glue to adhere properly.
Step 3: Press the Broken Sole to the Shoe
Now, align the sole and press it firmly against the shoe. Use a clamp or even duct tape to keep the sole in place, ensuring an even bond between the shoe and the sole. If using tape, wrap it tightly around the shoe for a secure hold.
Step 4: Leave the Shoe Adhesive To Dry
Finally, leave the glue to dry for 24 hours to ensure maximum bond strength. Avoid moving the shoe or disturbing the sole during this time.
The adhesive needs to be set properly to restore the worn-out soles to their former glory. Once it’s dry, you should have a shoe that’s ready for more adventures.
Related article: How To Clean Dress Shoes - Leather Shoe Care Guide
Useful Tips to Take Care of Your Shoes

Get your Stone and Clark's Sneaker Cleaning Kit here!
Assuming you're done fixing your crumbing shoes, there are some tips that you can employ to keep them in good condition and extend their lifespan.
- Invest in a Sneaker Cleaning Kit: Regularly cleaning your shoes prevents the build-up of dirt and grime that can contribute to the wear and tear of the material. A DIY approach with a sneaker cleaning kit that includes brushes, cleaning solutions, and protectants can be both efficient and cost-effective.
- Apply Repellent Spray: Using a quality repellent spray can create a barrier that shields your shoes from moisture, stains, and other damaging elements. This is a simple step you can take right after making your shoes look new again.
- Utilize Shoe Deodorizer: To maintain a fresh scent and inhibit bacterial growth that can degrade shoe materials, it's advisable to use a shoe deodorizer. Regular application after wear can significantly prolong the freshness of your footwear.
- Dry Shoes Properly: After cleaning, make sure to dry your shoes in a well-ventilated area but away from direct heat or sunlight. It's a straightforward yet critical step in preventing moisture damage.
- Store Shoes Correctly: If you've invested time and effort into restoring your shoes, ensure they are stored in a cool, dry place to maintain their condition. Shoe shops often have storage options like boxes or hanging organizers that can help keep your shoes dust-free and maintain their shape.
- Rotate Your Footwear: Wearing the same pair of shoes every day can accelerate wear. Rotate between different pairs to give your shoes time to air out and rest.
- Use Shoe Trees: Invest in good-quality shoe trees to maintain the shape of your shoes when not in use. This will also help to absorb any moisture and prevent creasing.
- Be Mindful of Your Activities: Remember to choose footwear appropriate for your activities. Avoid wearing your newly fixed sneakers in conditions they’re not meant to withstand.
Closing Thoughts
Don't just throw away your worn or damaged shoes with crumbling soles. With the right tools and dedication, you can bring them back to life. Not only will this save you money, but it's also a sustainable way to prolong the lifespan of your footwear.